Custom Super Nintendo PC – Console Mod
Built by user jamesregan2012 on RetroCollect.com
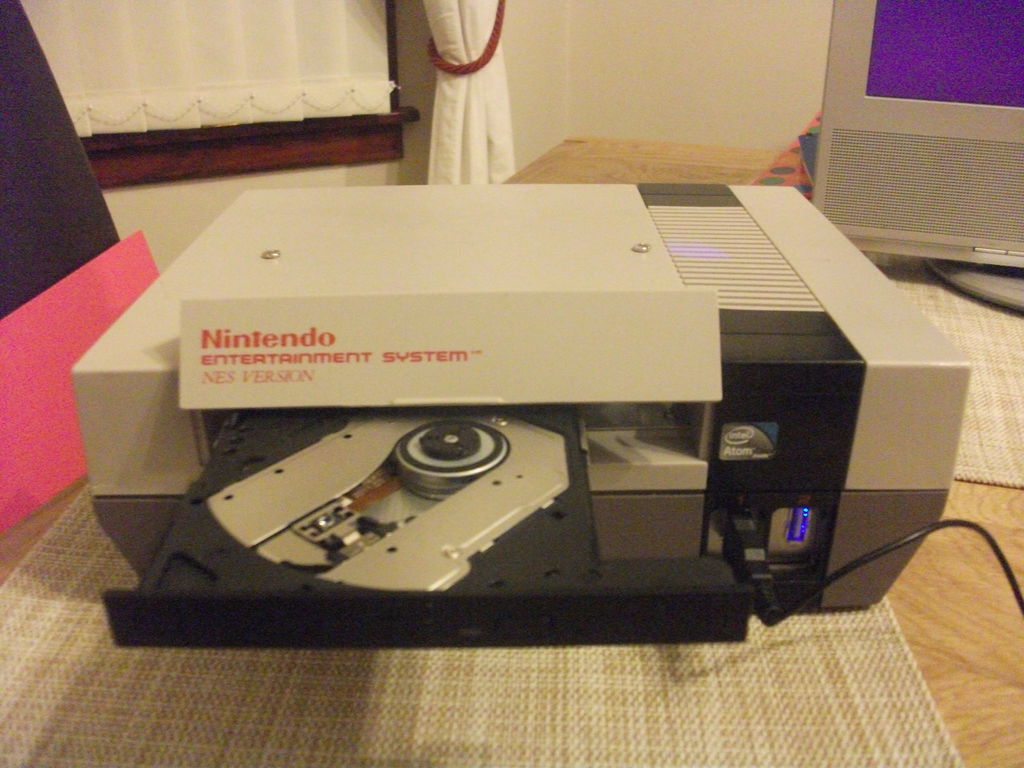
There is nothing wrong with wanting to create a beast of sorts, such as this NES HTPC (this link is now archived and it looks as though the images are gone), but honestly, I had no intentions of streaming movies, videos or music to my tv from an old school Nintendo® case. I already have a number of devices that can do this.
Aside from that, I’m a stickler for authenticity and keeping the console looking as original as possible was priority number one. Here are some of my other requirements:
- Reduce external modifications of the casing to almost zero
- Utilize existing controller ports and original SNES controllers (no external USB ports)
- MSATA hard drive to reduce required space inside
- External DC power supply
- HDMI connection for audio/video
- Embedded motherboard with low-heat processor (no fan)
- [OPTIONAL] Install mini wi-fi card for remote access (OS updates, software installations, etc.)
Why a Super Nintendo® PC?
I chose the Super Nintendo® console mainly because it’s the system I have the most nostalgic memories with, but for practical reasons, I wanted a system that would be able to play all of the old generation Nintendo® games (prior to N64) and the SNES controllers provide the perfect amount of buttons to support the original Nintendo®, Game Boy®, Game Boy Color®, Game Boy Advance® and of course Super Nintendo®!
Unfortunately, the SNES is not as spacious as the NES, so I had to find the right PC components that would fit. I settled on a typical mini-ITX motherboard and opted to go with an embedded solution so I wouldn’t have to deal with the vertical height of having a processor fan installed. To reduce internal wiring and cables, I opted for an MSATA hard drive and an external power supply.
Parts List
Depending on how much you intend to copy what I created, your mileage will vary with what you need and how much these parts cost.
- Super Nintendo console — A lot of purists (myself included), don’t like the idea of hacking up perfectly working systems, so try to find one that’s already broken since you won’t need the internal parts anyway.
- Controllers — There are plenty of aftermarket controllers that support USB, but I opted for the original controllers to maintain authenticity.
- Intel® Desktop Board DN2800MT — Mini-ITX format with an Atom N2800 processor. I chose this board because it has support for HDMI and DC power. A lot of mini-ITX boards still require a standard ATX power connector which you could convert to a PICO power supply, but I didn’t want to add in more wires/adapters.
- MSATA hard drive — Be sure to get one that will hold your chosen operating system and all the software you need. I’m installing Windows 7 Pro 64-bit so I picked up a 64GB drive for about $20 on eBay.
- DC jack adapter — This adapter converts a standard DC barrel connection to a 2-pin ATX plug.
- 4SNES controller USB adapter — This is a major component of the system which enables it to use the original controller ports on the SNES by adapting them to an internal USB port.
- HDMI screw mount adapter — This is used in order to have an HDMI port mounted on the back panel of the SNES since the motherboard won’t line up properly.
- Windows license — If you plan to install Windows on this machine, be sure you have a valid license. You can pick up working OEM Windows 7 or Windows 10 Pro licenses on eBay for under $30. Please note that you must be a qualified systems builder to use Microsoft OEM product keys.
- Miscellaneous wiring — You will need some spare wiring in order to wire up the controller adapter and power switch the way I’ve done it. You might also want to salvage the power switch from and old computer and possibly a USB header cable.
Obviously, you’ll need some basic tools as well. A Dremel® rotary tool will come in VERY handy for cutting down the console casing to make everything fit and of course, a soldering iron.
The Build
To start, we need to modify the SNES case to fit the motherboard. This was a lot easier than I thought it was going to be. The goal here was to get the rear ports of the motherboard facing the rear of the system to enable rear access to the HDMI and DC ports. I wasn’t able to get the ports to actually touch the back of the casing, so I knew that I was going to use extenders. This wasn’t an issue since I needed to ‘move’ the DC jack to the other side of the unit anyway in order to use the original DC hole.
I got lucky with the motherboard as I was able to salvage the original SNES power switch and its standpoints. All I did here was make two cutouts at the bottom of the stands so the motherboard could slip in allowing me to fit the mother board on the opposite side without further modification. Since the original power button was a basic toggle switch, I decided to use this to provide overall power to the computer…in essence, it became the power switch to the power supply. Because I still needed a momentary switch to actually power on the computer, I was able to re-purpose the original reset button as the computer power button. So to power on this unit, you simply slide the power switch up, then press and release the reset switch. Turning it off is the same process, but in reverse.


SNES controller port conversion
The awesome 4SNES device was a dream come true for my idea! Instead of having to hack up the system to make USB ports accessible for game controllers, I insisted on using the original controller ports. The problem was that I didn’t have much space to bring a USB cable around to the rear port of the motherboard, so my plan was to wire it to a front USB header port.
However, even after verifying the USB pinouts for the header cable, for some reason, this device would not work. I retested it with a standard USB cable and it worked perfectly so I knew it was just a limitation with the 4SNES. To resolve this issue, I soldered the wires from the 4SNES directly to the pins on an external USB port where it is installed into the motherboard. In effect, this was the same as if I had plugged a USB cable right into the onboard ports. Keep in mind that doing it this way will render the actual port useless as plugging in another device will draw too much power and cause the controllers not to work. This wasn’t an issue in my case since I only needed one USB port for the wireless keyboard and mouse receiver.


Running HDMI and power
Ideally, I would have loved to have the motherboard’s HDMI cable run directly to the rear of the system, but it wasn’t meant to be. Instead, I mounted the screw-on HDMI port to the back of the system near where the original A/V cable went and then used a couple right-angled adapters to allow me to bend the cable into place. It seems overkill to use so much hardware to extend the HDMI connection a few millimeters, but it’s all in the name of trying to keep external modifications to a minimum!
Since this motherboard’s HDMI port supported audio out, I didn’t have to add any additional components to connect the audio.
The DC jack for the external power supply was probably the easiest part of the installation since I was able to use the existing DC jack port in the SNES case. All I needed to do was screw the new jack into the hole and run the power line over to the ATX connector.


Installing and configuring software
At this point, the project is pretty much complete and installing Windows 7 was the same as it is for any computer, so I don’t need to go over that here. Once it was up and running, I chose to use the Maximus Arcade frontend since it’s the one I found to be the easiest to configure (although sometimes frustrating) and also, I’ve been using it for years on a MAME arcade project of mine.
Functionality
As mentioned above, powering on the unit is as simple as flipping the power switch up and pressing the reset button. Originally, I had thought that the reset button would be a cool way to quit the current game and take the user back to the game menus, but then I figured it would be a hassle to get up every time you wanted to switch games. Instead, I created a specific controller input that exited games. To do this, you just press L + R and then Start + Select all at the same time.
When the console powers up, it begins the boot process using a custom boot animation screen I made to replace the Windows® 7 name with the name of this new system: Ultimate Nintendo® Entertainment System. I have a local admin account set to auto-login. To reduce the appearance of a computer running this console, I simply hid all the desktop icons and hid the Taskbar. Maximus Arcade was set to startup with Windows®, so everything loads up without any user intervention.
All the navigation takes place on the game controller and selecting a game is as easy as pressing Start. I would say that the only downside to using original controllers is that there are no extra buttons for mapping any special features like game saving/retrieving or any emulator functions like speeding up and slowing down games. But, I can’t really complain since I did set out to produce a close-to-original as possible gaming machine. With that said, every game functions just like it originally did…if the cartridge had saving capabilities, so do these.
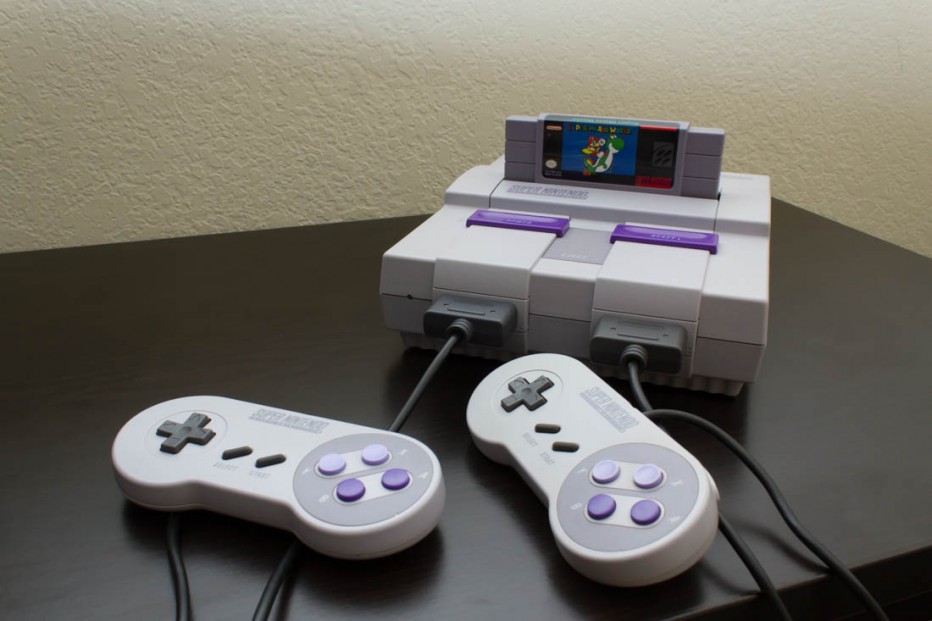
Here’s the completed project. As you can see, without looking at the rear of the unit, there’s no way you can tell that this isn’t an original, working Super Nintendo®! I added the cartridge on top for the full effect. It’s actually an empty shell of a cartridge because the whole one wouldn’t fit into the system anymore now that there’s a computer inside. What I did was find a non-working Super Mario World, removed the game from inside and chopped the cartridge in half. I haven’t decided yet if I want to glue it in place, but if I do, I plan to cut some heat slots in the rear to help relieve some of the heat from inside.